
Thursday, August 14, 2014
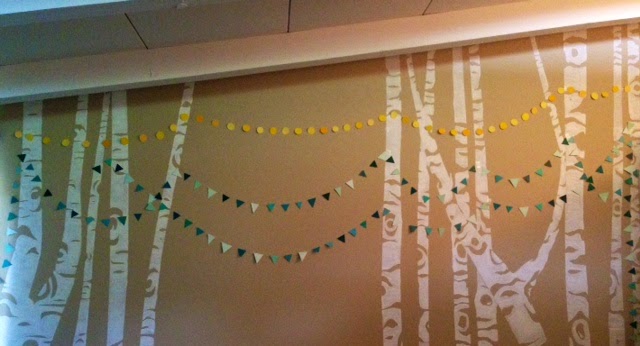
Birch Tree Forest Wall Art
DIY Birch Tree Wall!
This was such a fun DIY! Having had all the materials from previous projects,
this whole project was FREE! Doesn't get better than that.
Materials:
1.) White Paint/Primer
2.) 2 Paintbrushes (1 Medium, 1 Small)
3.) Blue Painters Tape
4.) Step Stool, or Ladder if you're short like me.
5.) Pencil
I wont lie to you, this takes awhile, but it is well worth it!
Step 1: Sketch! Never go into a project like this blind. Its always best to get your perspective right on paper first before you begin.


(My First Tape Attempt) (Final Tape Design)
Step 2: Tape! This is the hardest part of the entire thing! Make sure you step back and look at your work as you go. I moved trees around for a full day before I was happy with a design. If you are planning on putting furniture in front of your wall, I suggest marking their locations so you can plan your trees around them.
Step 3: Paint! Find a reference and go nuts! I attempted to draw a design on the first tree, but found it was much harder to cover or remove lines once I started painting. I just went for it! Let me first tell you that I have my Bachelors in Illustration so I'm obligated to be good at this stuff, but please don't try this if you aren't feeling confident. Draw light designs and everything will be just fine. I also starting pulling away tape early to get a better feel for the width of the trees, but thats up to you.


Step 4: Clean up! Remove the the blue tape, ( if you haven't removed it already) and use your small brush to touch up blurred lines. If you over lapped your trees, you'll also have to connect limbs where tape ran between them. This takes time and patience, so clear a couple hours and crank some music.
Tadaa! 4 Steps and a few days! This just made my room so cozy and whimsical. I just love looking for faces in the trees, and their glow from the TV at night. I used paint swatch samples to make banners of lights and flags to decorate the wall and plan on adding an owl off a branch. This project is great for any room and any age. Enjoy!
Tuesday, July 22, 2014
Table Makeover
The Best Furniture is FREE Furniture!
My Father-in-law is fabulous at finding treasures on the side of the road,
and for that my house is thankful. His latest find was this wonderful utility table on wheels. Of course I just had to do a little tweaking, so here are my quick steps!
and for that my house is thankful. His latest find was this wonderful utility table on wheels. Of course I just had to do a little tweaking, so here are my quick steps!
 |
| (Before) The very best part about this project is that is cost less than $5.00! Maybe even free for those of you have leftovers from past projects. Run down to your local hardware store and pick up a can of RUST-OLEUM. This stuff comes in so many colors and covers almost everything!  ($3.99 + tax) Step 1: Remove the wheels. Place the exposed legs of the table onto pieces of newspaper. Be sure to pick a safe location to spray your table. I usually set up shop in the shade of our trees.   (Give your wheels a quick rinse, you never know where they've rolled last) |
Step 2: Read the directions on the back of the can and spray away!
I like to work in a circle when spraying large objects. This was you can see your work in different lights and find missed areas. It's up to you if you want to paint the underside of the table.I like to go with the theory, 'out of sight, out of mind.'


(Make sure the newspaper does blow up and scratch your legs)
Side Note: Wear gloves.
I think the picture says it all on this one.

(If you don't have gloves, use a plastic baggie)
Tadaa!! Pop those wheels on and roll away!
With the heat of the summer, it took my table much longer to dry.
Be sure your table is completely dry before bringing it inside.


I love this table!
I can use it almost anywhere in the house!
For now It's hanging out with the puppies toys, but I'm bound to move it again!

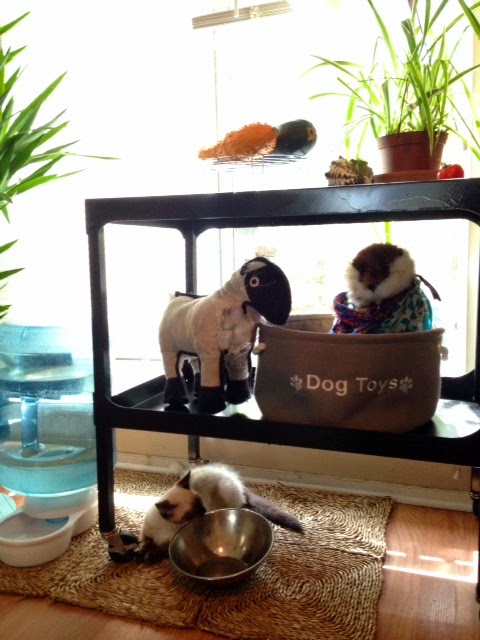
Even the kitten loves it! Enjoy!
Easy Upgrade!
Tired of daily refills? ..
 |
With the heat of summer upon us, it's important to keep your animals hydrated. This quick switch ensured my animals days of water! No more coming home to empty bowls! |
Tuesday, July 15, 2014
Hanging A Finished Puzzle
Puzzles can be a lot of work,
so why take them apart when you're done?
In only a few steps, you can turn your finished puzzle into hangable artwork.
 |
Materials: Puzzle (complete), Cardboard, Scissors, ModPodge,
Paintbrush, Sharpie, Exacto Knife, Metal Ruler, Tape, Fishing Wire
 
Step 1: Put a coat of ModPodge on the top of your finished puzzle with an old Paintbrush.
This will help hold everything together when you transfer it onto the cardboard.
Try to keep your brushstrokes consistent in direction.

Step 2: Take the measurements of your puzzle with your ruler and draw out
your rectangle with your sharpie on a piece of cardboard.
 
Step 3: Cut your rectangle out using your exacto knife. When you are finished lay it over top your puzzle. Use your scissors to trim off any excess cardboard. *I suggest cutting your rectangle a little smaller than the actual size of the puzzle, to ensure you don't see cardboard when it hangs.

Step 4: Use your ruler to find the center of your piece of cardboard. Then pick a measurement
that works for your puzzle, and mark two spots equal length apart from the center. Take your time with this. Once your marks are equal, with your exacto knife, slice a small horizontal cut on your mark.

Step 5: I know this is hard to see, but cut a piece of fishing wire and thread it through your cut.
Once through the back, tie a knot and tape it down upright onto the back of your cardboard.
(The side that we will be glueing the puzzle to.)
 
Step 6: Pull your fishing wire to the top and middle of your cardboard to get an idea of about how much
more you will need. Repeat Step 5 on the other side. If you find that you have to much wire, just tie a little
knot to get it to where you want it to be.
 
Step 7: Here comes the tricky part! Find something to help you transfer your puzzle onto your cardbaord. I used a cookie sheet. Next, put a hefty layer of modpodge onto your cardboard. Make sure to hit the corners and move quick. The more it dries, the less you will be able to move it when you transfer your puzzle.
Once the glue modpodge dries you are ready to hang!
I used this Saturday Evening Post Puzzle in creating a
Marine Corps Tribute Wall for my boyfriend.

See that wasn't so bad! Enjoy!
|
Wednesday, July 9, 2014
Every Artist Needs An Inspiration Wall

Here's a little peak at my Inspiration Wall. It was once just a few nails and fishing wire, but now is filled with an array of items. Some are finished projects that I'm still adoring, but most of them are unfinished and screaming for attention. I've added pictures, ribbons, aprons, puzzles and even some drying flowers. It doesn't matter what you add, as long as it continuously inspires you to keep creating!
Wall Decor
Hanging Pictures Doesn't Have to Be Scary!
 |
| A Marine Corps Tribute Wall |
3 Easy Tricks I Learned Along The Way!
1.) Move things
around! Lay your frames out on the ground before you start
to hang. Some people may suggest tracing your frames on paper and using them as
templates to move your design around. I think its better to use the actual
objects you will be hanging, as some colors may look better next to others and
so on.
2.)
Grab a pencil
and a ruler! Make sure to measure the locations of each hinge on all of the frames.
This may not be the best idea, but go ahead and draw right on the wall! As long
as your walls aren’t white and you draw lightly, your marks should erase off
easily. Besides, it’s better than putting extra holes in the wall.
3.) Learn to love
your level! Make sure your level is out for this entire project. There is
nothing worse than stepping back to see your entire masterpiece is crooked.
Subscribe to:
Posts (Atom)